

How To Repair Black Edging
How to Repair Curved Backyard Edging
Use longer lengths to make this repair look good
Damaged backyard edging is easy to repair when it's a straight department, but curved pieces are more complicated. To maintain a natural curve, replace a long section and have extra care with the splicing.
Y'all might likewise similar: TBD
Begin the repair at the start of the bend

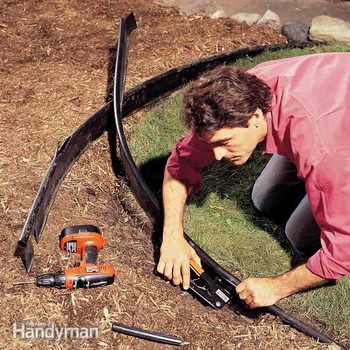
Photograph 1: Saw the old edging
Saw through the edging after removing the soil and mulch on both sides. If the damage is on a curved area, cutting farther back to where the edging runs straight so the newly installed piece can brand a more than natural, svelte curve.

Photo two: Cutting the replacement piece
Prepare the new edging for installation. Cut the new piece long enough to lap onto the end of the curve (every bit shown in Photo 3), and then fix both ends by cutting and removing a 4-in. section of the tiptop tube and bottom anchoring flange, leaving a 4-in. flap in the middle.

Photo 3: Bring together the sections
Fasten the new department to the old one by offset installing a vii-in. plastic connecting pin between the old and new tubular tops and drawing them tightly together. Drill four 1/8-in. holes near each corner of the overlap flap and install ane/viii-in.-dia. medium-length rivets.

Photo iv: End the splice
Mark the final cut on the old edging by pulling the new slice tightly around the curve, using the top tube as a guide. Insert the connecting pin, overlap the flap and rivet that end besides. Backfill the trench and restore the mulch and sod.
In your haste to finish mowing the lawn and get to the golf course, you mowed correct over the plastic lawn edging and mangled it. To make matters worse, you inflicted the damage on a curve. You tin't just splice in a footling 12-in. piece—that would create a pointy piddling bulge. To restore the natural curve, you need to cut back and splice in a longer section of new edging to supervene upon the existing border from the beginning to the end of the bend.
Note: Use this repair for all types of border edging.
Brainstorm by laying the replacement edging apartment in the sun to make information technology more pliable and relax the curve. Adjacent, make the first saw cutting through the onetime edging (Photo 1) at the beginning of the curve. Brand just one cut for at present. Cut the new edging long enough to extend past the damage and gracefully merge with the existing edging at the cease of the curve.
Set both ends of the new edging as shown in Photo 2. Afterwards the outset saw cutting, barrel the former and new pieces together and secure them with a connecting pivot and rivets as shown in Photo 3. Finally, apply the new edging every bit a guide for marking and cutting the old edging (Photograph 4), and so drill and rivet that articulation like the first. (Avert using a tape measure out to measure the length for the new section because a metallic tape can't accurately follow a bend.)
If necessary, pound spikes through the anchoring flange and into the ground to concord the edging in place.
Now grab those golf clubs and Become!
Required Tools for this Project
Take the necessary tools for this DIY project lined up before y'all first—you'll salve time and frustration.
You'll as well need a hand riveting tool
Required Materials for this Projection
Avoid concluding-minute shopping trips past having all your materials ready ahead of fourth dimension. Here'due south a listing.

Source: https://www.familyhandyman.com/project/how-to-repair-curved-lawn-edging/
Posted by: hendersonofectown.blogspot.com
0 Response to "How To Repair Black Edging"
Post a Comment